

 Schools Tender Snowplough kit")
")
 Conflat D kit")


Building a layout like Atherstone Court with it’s outer urban location and predominance of structures over greenery requires a fair amount of scratchbuilding. With the exception of three buildings on the 8 foot by 2 foot scenic section of the layout, all are scratchbuilt, the other three being modified in some way and clad with new textures.
A rather silly bugbear of mine when visiting shows and exhibitions is seeing the same structures and backscenes on many layouts. That, coupled with an interest in shall we say “less aesthetically pleasing” brutalist and downright ugly buildings has pointed me towards having to start with a blank canvas.
Years ago, I approached structure modelling with a similar start point. Working in the pre-press areas of the print packaging trade I was always trained with the mantras “draw everything once” and “measure twice, cut once”. In those days my work and modelling endeavours were very traditional affairs, using rulers, pencils, scalpels, straight edges, double sided tapes, and plasticard. Painting bricks and mortar courses on embossed plasticard sheet was always a chore and to be honest I was never enamoured by the results. As you will see, some of those methods and tools still remain in my toolkit, but I now combine traditional modelling skills with my knowledge and experience of CAD and 3D printing. Not as a means of “showing off” or as some have said, “cheating”, but merely as a method of building straight and accurate reproducable structures that fit together perfectly the first time of asking.
My workflow is thus:
- Research and photograph
- Measure available space and create in CAD
- 3D print formers FDM using PLA/ PLA+
- Create 2D “cutter” drawings from 3D CAD files to aid creation of wrap textures
- Create texture artworks for exterior and interior surfaces for “wrapping” the print. I use Photoshop, but any image editor will do the job.
- Print textures on a standard desktop printer.
- Apply texture wraps
- Create window frames and external details in CAD and resin print
- Finishing touches and lighting
Research and photograph – Choosing a subject
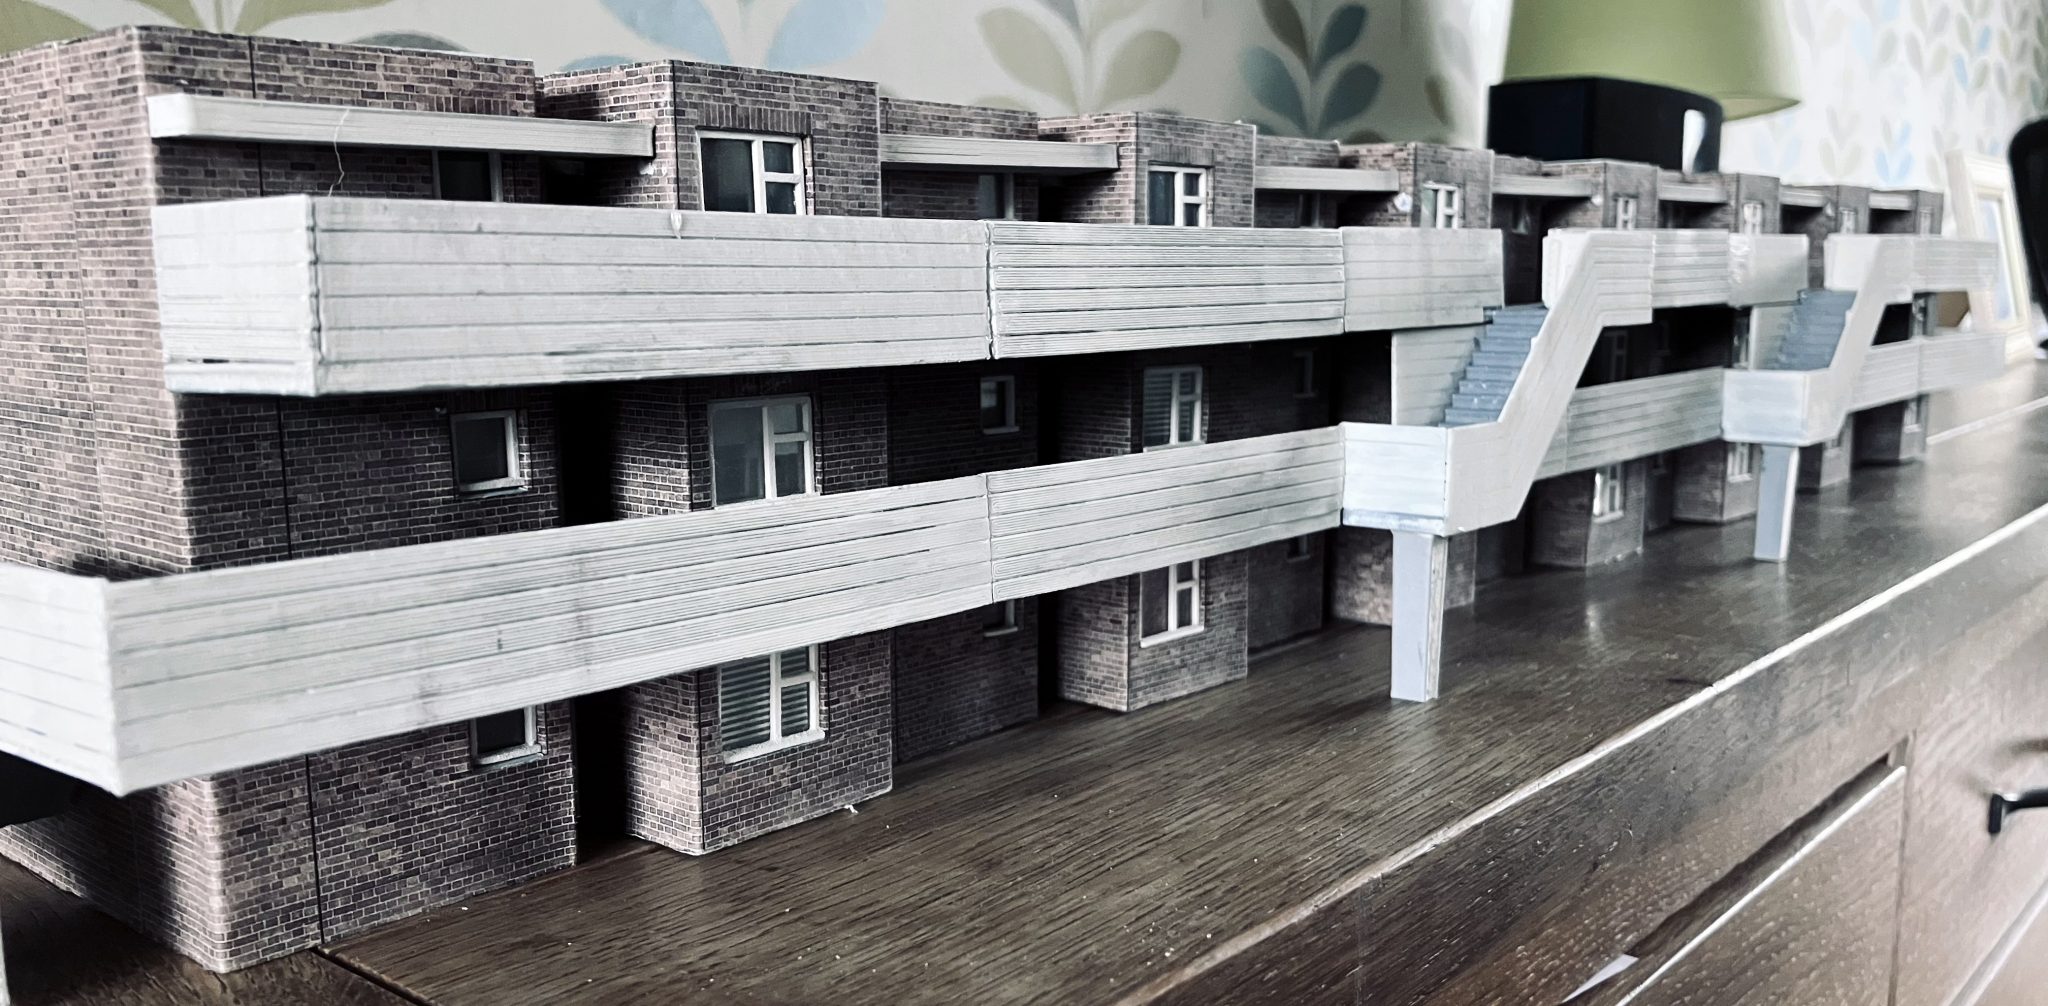
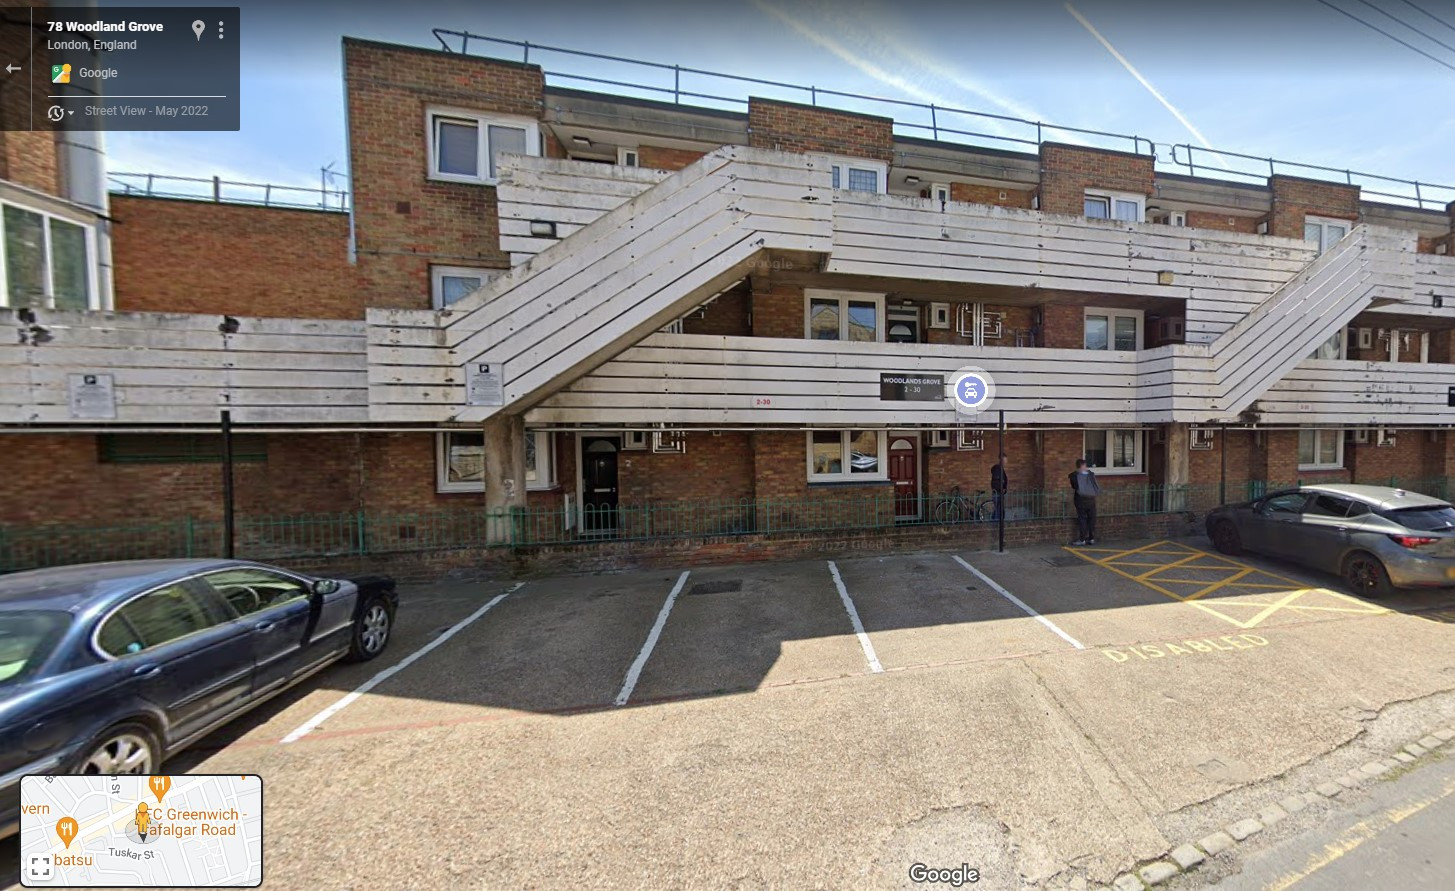
For this article I have chosen to describe how I built and finished the public house on Atherstone Court. The largest structure on the layout is a block of three storey flats based on Woodland Grove in Greenwich, London.
Many social hosing schemes and “model villages” built in Britain in the early 1970s were built with accompanying facilities. Depending upon the size of the scheme, many were built with shops, take-aways, car parking garages and a public house. “Overhill Heights” comes with garage blocks and a public house, the “Cockwell Inn”. So named after Sir Humphrey Cockwell, a fictional locally-born housing developer, councillor and political party donor. And you were thinking it was meant to be rude….
The name “Overhill Heights” is partly plucked from a street name in East Dulwich, “Overhill Road”. As well as being home to a very long and sprawling mix of housing styles and a Londis shop, it also happens to be the street where Bon Scott, the former singer with rock band AC/DC was found terminally asleep in a Renault 5 in February 1980. Outside number 67 if anyone, like I did in 2010, fancies a pilgrimage.
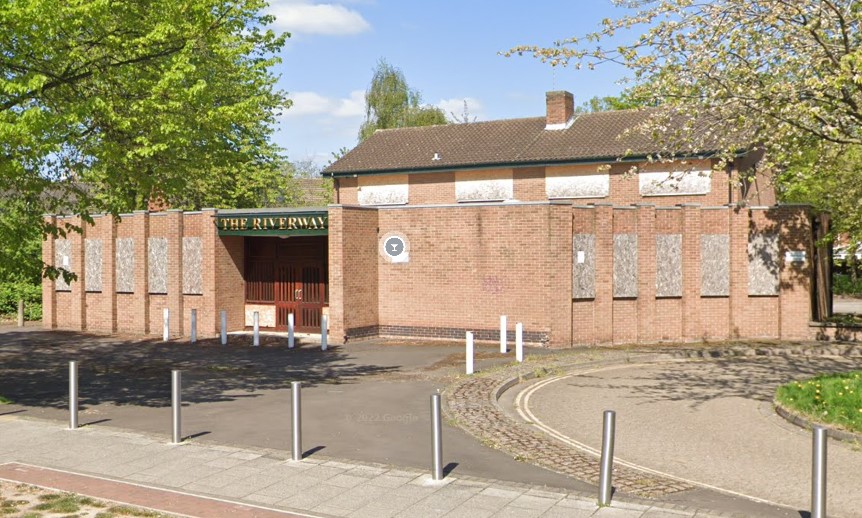
Obviously, as the facilities provided were built at the same time and designed by the same architects as the housing, they tended to take on a similar style. In the case of this model, flat-roofed, grim, and largely unwelcoming. I looked around for inspiration from a variety of sources, including two former pubs in the village where I live in Derbyshire, but settled on one that I have walked past, and once frequented (can one once frequent?) in the Meadows in Nottingham. The chosen base for my model was The Riverway, a once popular stop-off for Nottingham Forest Fans on their way to the City Ground on match days. And that my friends, is how my dad once got me in there.
Create in CAD
With a suitable subject chosen, photographed and sketched out, it was time to start drawing the formers in CAD. My software of choice is Fusion 360 from AutoCAD. There is a free version avaibale for hobbyists, but other free alternatives are available such as FreeCAD, TinkerCAD, as sell as some excellent commercial software such as TurboCAD Professional.
The way I approach structures now is to create everything in 3D CAD software in 4mm / 1:76 scale and then break that model down into components. Some of these will be 3D printed FDM in PLA, some will be printed SLA in resin, and some will be cut from card. As most if not all of those wall former components are going to be covered in some form or another, the quality of the filament and quality of the print isn’t too important. All we are looking for here is structural integrity and dimensional accuracy.

3D print formers FDM using PLA/ PLA+
A good tip when printing walls for illuminated structures is to use black PLA as it prevents light “bleed” reaching the outside surface and spoiling the model.

With all of the wall formers 3D printed, these were then joined together imitially with Plastic-Weld. The reason I do this is that it gives me a little bit of wiggle room and time to get the components aligned perfectly. Once I am happy that all is square and correct, I leave to set for around 20 minutes. Once the Plastic-Weld has done it’s thing I run cyano glue down the inside of the joins and spray them with an aerosol activator. Cyano activators are a godsend for modellers, and are now starting to appear in the high street. Boyes, The Range, and Poundland all sell them. In fact, The Range do their own line of cyano superglue named “Strongarm” which is the best superglue I have ever used for the price.
Creating “cutters” and texture wraps
With the 3D CAD build largely complete, I then create a series of fullsize drawings that I can use as cutter overlays in Photoshop when building textures. This provides me with an accurate full size cutting guide. For one-offs like the pub I will print and then cut by hand. For repeated or multi-component buildings like the retaining walls or flats I will print and then digitally cut on my Graphtec digital cutting machine. It is far quicker and more accurate than I am, but it does require a bit of setting up artwork-wise.

For textures such as brick, masonry, roof tiles etc there is an incredible resource over on the Scalescenes website in the “Scratchbuilder’s Yard” section.
John is a very talented artist and for less than the price of a high street coffee you can download the texture you need as a PDF and print it at your will. I have no afiliation with John or Scalescenes, I just love his work.
I tend to use a mix of Scalescenes textures and my own. I start with those as a base and add weathering / dirt in Photoshop rather than with the airbrush afterwards, as it gives me much finer control over the placement and the degree of muck required. I always add around 8mm of “bleed” on the textures where they overlap. This prevents them finishing shirt and leaving gaps and also gives a decent width on which to appky adhesive or double-sided tape.

Choosing print media and printing textures
I print all of my textures on a standard cheap Epson desktop printer. My own printer is a Workforce 2660 A4 setup. Really simple and no frills. As long as your printer can print “photo quality” it does not matter if it is an Epson, Canon, HP, Lexmark or whatever. My own preference is Epson due to the fantastic colour reproduction and build quality, but it really does not matter. Paper and ink choices are far more important. You will need a photo quality UNCOATED paper for wrapping. By uncoated I mean not semi-gloss or glossy. It really does need to be matt or uncoated. Your standard “multi purpose” printer paper won’t cut it I’m afraid so I have a ream of special paper which I hide away from people in the house wanting to print homework, recipes or postage labels.
Tip – If you intent to also build Scalescenes kits you will also need some inkjet photo card. Always choose the two from the same manufacturer matched for whiteness, or you will have a mismatch on colour when printed. The world’s largest online retailer is a good source for these materials.
The inkjet prints will need protecting from UV light and moisture at some point. This is to avoid the prints fading in the light or running / bleeding where moisture is present (i.e. painting or ballasting). I tend to do this after wrapping and immediately prior to glazing rather than post-print as the paper tends to curl if I do it now.
Once the inkjet textures are thoroughly dry, I chop them out with a scalpel and straight edge.
It’s a wrap
There are numerous ways to wrap the model and I’ve used many. The one I favour is the one I’ve used here and that is to apply a high quality double-sided ashesive tape to the plastic walls. I have also used 3M Photo Mount (gets everywhere and isn’t particularly nice to breathe in), carpet spray adhesive (ditto) and Gorilla Glue. Sticking to tape (pun intended), I tend to remove the backing from about 3 inches worth of wall at a time, This helps to avoid horrible accidents where the model “grabs” the paper texture and makes a mess of it. I just take my time and keep going until that run is complete.

A good quality uncoated photo quality paper will withstand a fair amount of pulling and prodding in to place. As you can see on the photo above, this wrap has a lot of corners to navigate, hence the need for a good quality double-sided adhesive tape or similar.


With the component now fully wrapped, it was protected using 3 coats from an aerosol “inkjet protect and fixative” spray and left overnight to dry.
Details
As Atherstone Court will be operated in day and night cycles, all of the structures are illuminated and therefore require a degree of interior detail. I have to admit to going a bit far on this one, but as the face of the building has alot of glass it was kind of necessary and hopefully worth the effort!?!


